Windows users know that their Windows receives updates from time to time. Some users receive an update on auto while others have to install it manually.
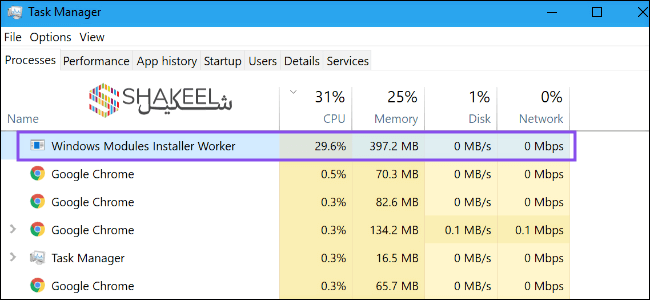
However, most users don’t know about the windows installer module worker and its users. So, here we will cover in detail what is a windows module installer and how to enable or disable it.
Windows module installer is a simple process that controls and manages windows updates. This process is responsible to manage auto-installation and modifications of updates. If you always find your system updated without any manual interference, then your windows modules installer worker is perfect.
How do I fix Windows Modules Installer Worker High CPU?
We are providing you two solutions for fixing this problem. You can try any of them.
Note: Both methods will stop Windows Automatic update on your PC.
Method 1: Stop & Disable the Windows Update service
1) Press the Windows logo key and R at the same time to invoke the Run box.
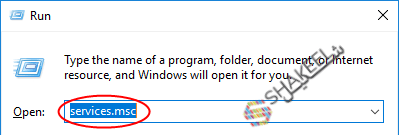
2) Type services.msc and click OK.
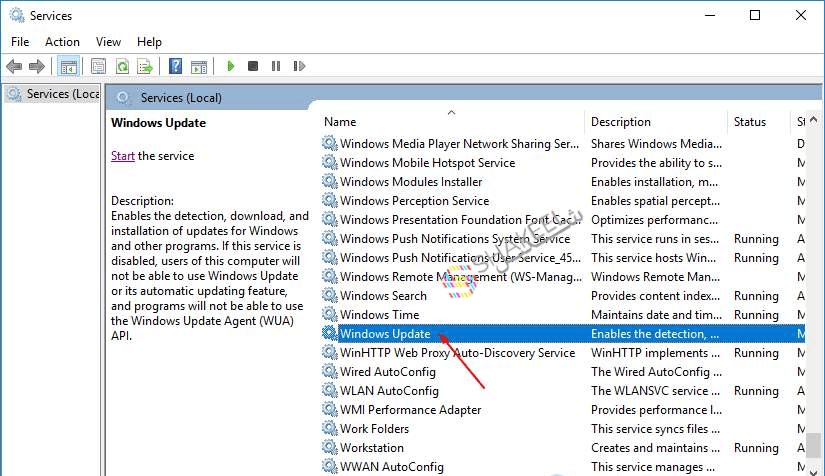
3) You should then see the Services window again. Double-click Windows Update.
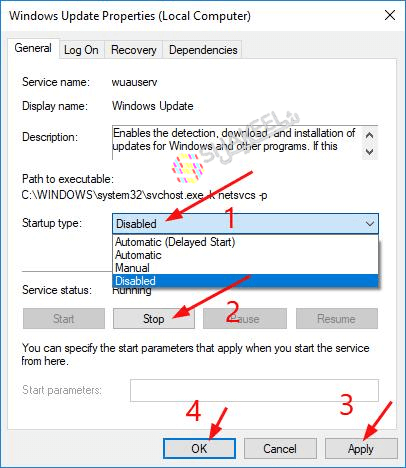
4) Set its startup type to be Disabled and click Stop. Then click Apply > OK.
5) The CPU usage on your computer should return to normal. If it doesn’t you can try Method 2 below.
Method 2: Change your Internet setting
Case 1: You’re using a Wi-Fi Network
1) Go to Start > Settings > Network & Internet > Wi-FI. Then click Advanced Options.
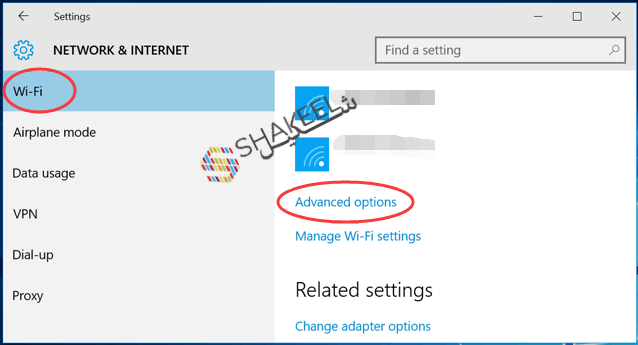
2) Tick on Set as metered connection.
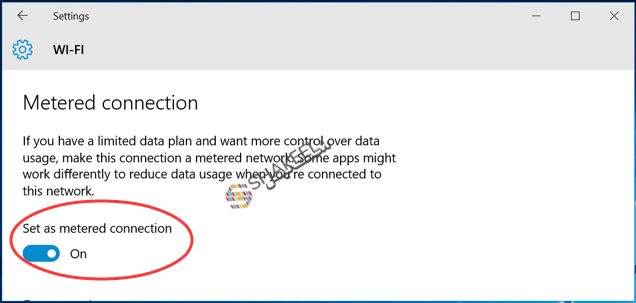
You’re done. Check if the problem still exists.
Case 2: You’re using an Ethernet Network
1) On your keyboard, press the Windows logo key and R at the same time to invoke the Run box.
2) Type regedit and click OK.
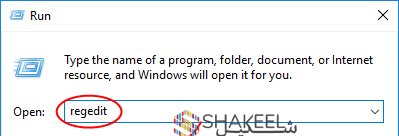
3) Click Yes when prompted by UAC ( User Account Control ).
4) On the open window, go to
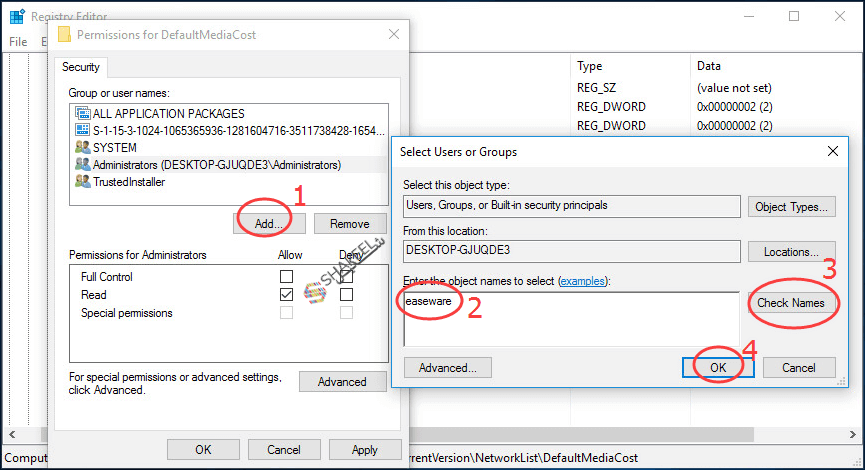
HKEY_LOCAL_MACHINE > SOFTWARE > Microsoft > Windows NT > CurrentVersion > NetworkList > DefaultMediaCost. Then Right-click DefaultMediaCost and select Permissions.
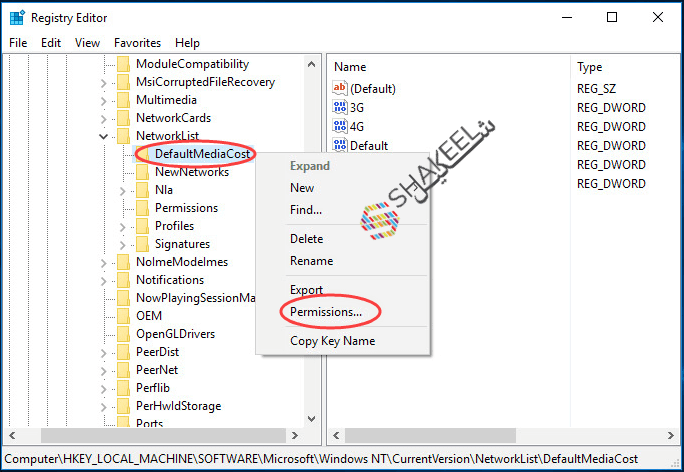
5) Click Add... Then type your user name into Enter the object names to select and click Check Names.
Click OK.
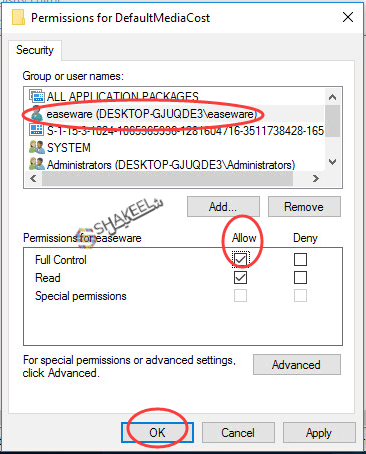
6) Click the user you just add, then tick on allow for Full Control.
Click OK.
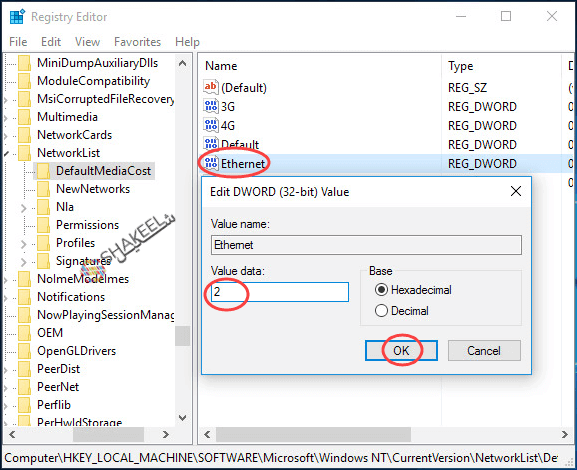
7) Double-click on Ethernet. Then set its Value data to be 2.
Click OK and close Regedit Editor window.
8) Reboot your computer.
Congratulations, Windows Modules Installer Worker may not cause a High CPU on your Windows.
What Exactly Is Windows Modules Installer Worker Or Tiworker.exe?
While most people don’t know, this module installer is a simple check. The basic job of this installer is to check and install updates automatically for your PC.
If you don’t want to keep checking, looking, and finding updates all the time and want windows to take over this job, then Windows modules installer is the perfect app to rely upon.
Sometimes it causes some issues as the installer messes up with other apps. You can find it out when the installer occupies a lot of space in the task manager.
A drawback is that it slows the system. However, a module installer is a very crucial app, and one can’t ignore it.
Is Windows Module Installer Safe to use?
While it may mess sometimes, the Windows module installer is generally safe to use. Neither it is a virus, nor it is any malware. Being a part of Windows, there is no risk in using it.
You can use this module installer to install auto-updates with no harm to the system.
Even if you are still worried, you may want to run a virus test or let your Windows Defender detect malware from your system. Thus, you will get to know that the Windows module installer is safe to use.
How to Fix Windows Modules Installer Worker?
Windows module installer is a very important app as it allows you to update the system using auto-updates.
However, sometimes it causes issues and problems. When it happens, you must fix it to get the most benefits. Here are some of the ways that you can try to fix your module installer.
Disable auto-updates
One of the basic ways to sort things will be to disable auto-updates on your system. This is a straight and simple solution.
The module installer works when the system is searching for updates. So, disabling auto-updates means that the module installer is no longer needed. Here is how to disable it.
- Open “run” in your Windows where we enter commands. You can access it by pressing “R”.
- Here type “services.msc” and then press OK. Here search for “Windows Module Installer.”
- Double click on it, choose from the manual. You will see that it is set to automatic. You will find the Windows update option which you have to double click.
- You will now find two options one is, manual search while another is to disable the search. You can select any one of them as per your preferences.
- Click on OK, restart the system, and you will see that the issue is sorted.
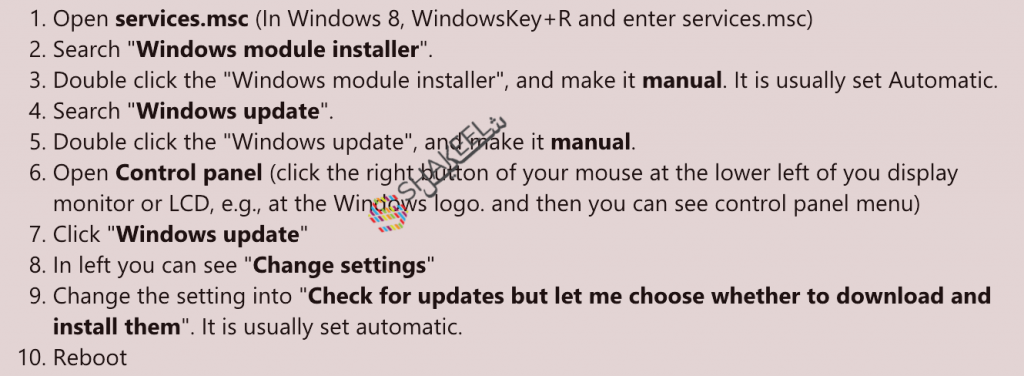
Once you select the manual option, the module installer will no longer search for auto-updates.
Now it is your job to search for updates from time to time and update the system as soon as an update reaches you. For most users, this method works to sort the issue. However, if your issues don’t sort, then move to solution 2.
Run Windows Troubleshooter
If there is some problem in the system file, then a Windows update troubleshooter is the ideal way to sort it.
You can run it to let the system find any issue and sort it directly. Open the settings tab on your PC and click on update and security. Click on troubleshoot and then click on windows update.
You had to select RUN and wait for the system to detect any issues. If there is some issue, the system will try to fix it.
If it happens, your system will run efficiently. If the system fails to find any issue, then it’s time to proceed towards a third solution.
Use Metered Data Connection
If your issue remains, then you can try the third way. In this method, you must connect metered data connection to your system.
The main benefit is that metered data doesn’t take up too much space. Thus, even if the module installer takes more space, your system will accommodate it.
Doing this is very simple. All that you have to do is click on the START button, click on settings. Select Network and Internet and find Wi-Fi from the options. Click the Advanced button from the options and ON the metered connection.
Why do Windows Modules Installer Workers take so much load?
There may be various reasons if your system is slow. However, Windows Modules Installer might be one of the biggest reasons.
The module installer takes so much load because it is constantly loading and searching for new updates.
Though auto-updates have many benefits, it has some serious cons too. One of the major ones is that it consumes a lot of space on the disc.
Some people disable the auto-update feature of the system and update the system using manual options. In this case, it is awesome to install updates at night or any other time when there is little system load.
How to enable back Windows Module Installer?
If you have previously disabled Windows Module Installer and found that the issue was something else, then you may want to enable back the module installer.
While that seems a simple task, you must follow these steps to enable the module installer successfully.
- Go to the task manager on your PC and click on the services tab. You will find Open Services Button in the last of the list you clicked.
Search for Windows Modules Installer Worker in the given list. Right-click your mouse and go in the properties of the files. Click on the Automatic option in the Startup type field. Thus, your Windows Modules Installer Worker will again auto-update the system.
Want us to fix the problem for you?
If you don’t have technical expertise or lacking time to troubleshoot the problem, get us to fix this problem for you. We have a team of freelance web developer in dubai how can quickly investigate to see if they can fix it remotely.
